Managing Layers
In this section, you will learn how to filter, sort, and search layers. You will also get to know how to view footprint on a layer on the map.
Filtering Layers
This section explains how to filter and find specific layers.
You can use each filter individually or combine 2 or more filters for more precise results.
For example, you can combine the date range filter with the source data type filter to find layers that have acquisition dates within a specific range and belong to a particular data source.
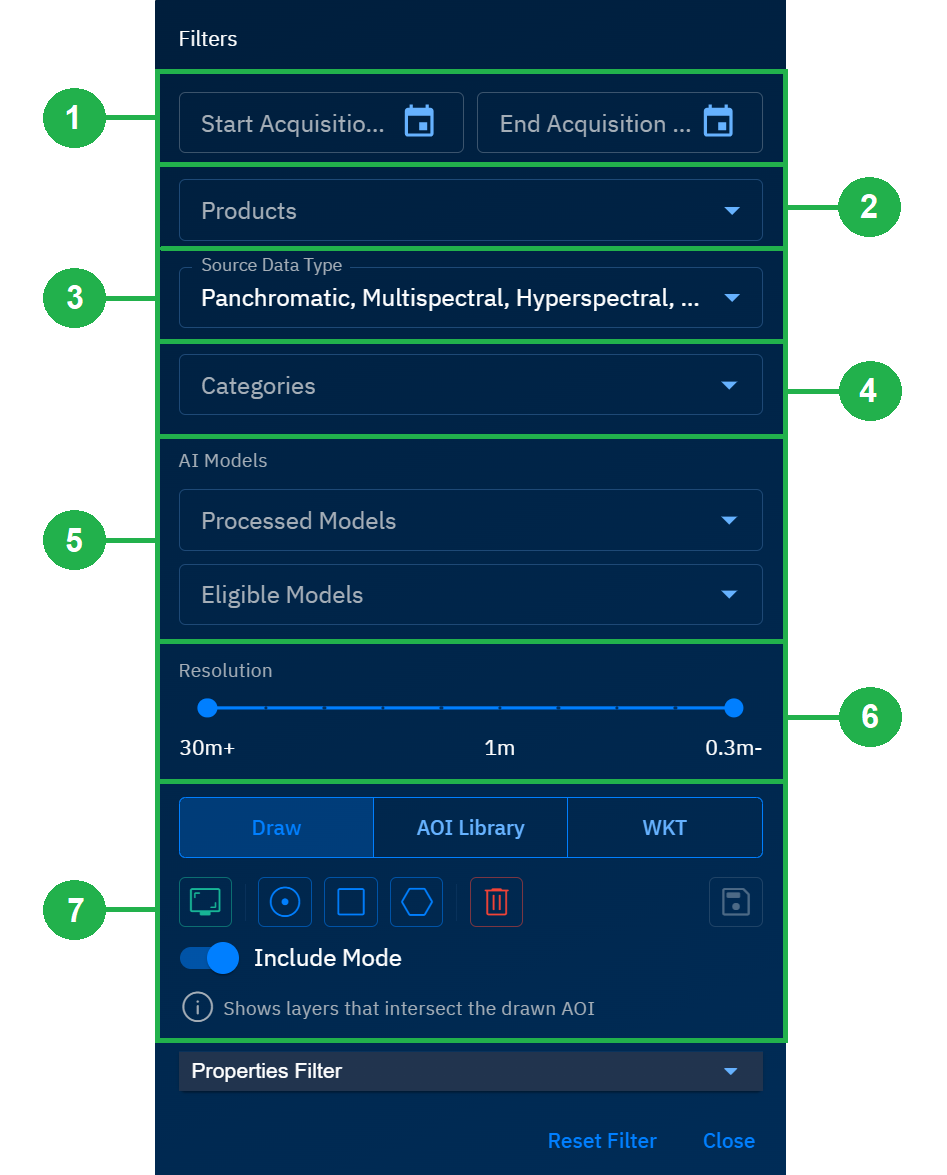
As presented in the following screenshot, you can filter layers in the following ways:
| # | Filter Option | Description | When to use |
|---|---|---|---|
| 1 | Acquisition Date Range | Limits results to layers captured between two dates/times. Supports absolute dates (e.g., 2025-09-01 → 2025-09-15) and, where available, time-of-day. | Isolate events, seasons, or same-day stacks; align scenes to campaign windows or revisit schedules. |
| 2 | Products | Narrows results by product type (e.g., raw scenes vs. processed products such as orthorectified, change detection outputs). | Pull only analysis-ready outputs for delivery, or only raw inputs for custom processing. |
| 3 | Source Data | Filters by data provider/origin and sensor family (e.g., vendor, mission, platform). | Enforce licensing/contract sources; keep sensor characteristics consistent across a study. |
| 4 | Categories | Searches by taxonomy/labels applied to layers (e.g., domain tags, project tags, detection classes). | Retrieve layers grouped by project, theme, or detection class for faster triage. |
| 5 | AI Models | Returns layers produced by or associated with selected AI models (e.g., detections, segmentations, model versions). | Audit specific model outputs, compare versions, or assemble validation samples. |
| 6 | Spatial Resolution | Constrains results by ground sample distance (GSD) or cell size (e.g., ≤ 10 m). | Guarantee minimum detail for mapping tasks, or harmonize resolution across inputs. |
| 7 | AOIs | Filters to layers that intersect one or more Areas of Interest (drawn polygons, uploads, or saved AOIs). | Limit results to your study area; avoid downloads outside your operational footprint. |
| 8 | Properties filter | Advanced filter on metadata key–value pairs (e.g., polarization=VV, cloud_cover<10, orbit=DESC). | Express precise constraints not covered elsewhere (e.g., polarization, orbit, cloud cover). |
Acquisition Date Range
Select a specific acquisition date range to find layers.
To filter layers by acquisition date range, do the following:
-
Log in to platform.
-
Click the Globes module, click the Explore module, click the Filter icon.
-
In the Filters dialog, click the Start Acquisition Date field and End Acquisition Date field to the related layers.
The Explore module dynamically displays all the related layers.
- Select any layer and feel free to explore it further.
Products
Select vendor and products offered by the vendor to find layers.
To filter layers by acquisition date range, do the following:
-
Log in to platform.
-
Click the Globes module, click the Explore module, click the Filter icon.
-
In the Filters dialog, click the Products field drop-down list, and do one of the following:
-
Select a Vendor to select all the products offered by the vendor
-
Open a Vendor and then select specific products offered by the vendor
The Explore module dynamically displays all the related layers.
- Select any layer and feel free to explore it further.
Source Data Type
Select a source data type filter to find the related layers.
To filter source data type, do the following:
-
Log in to platform.
-
Click the Globes module, click the Explore module, click the Filter icon.
-
In the Filters dialog, click the Source Data Type drop-down list, and then select one or more data types to find the related layers.
The Explore module dynamically displays all the related layers.
- Select any layer and feel free to explore it further.
Categories
Select category and sub-category to find a layer.
To filter layers by category type, do the following:
-
Log in to platform.
-
Click the Globes module, click the Explore module, click the Filter icon.
-
In the Filters dialog, click the Categories drop-down list, and then select one or more categories and/or sub-categories to find the related layers.
The Explore module dynamically displays all the related layers.
- Select any layer and feel free to explore it further.
AI Models
Select processed AI models or eligible AI models to find a layer.
To filter layers by category type, do the following:
-
Log in to platform.
-
Click the Globes module, click the Explore module, click the Filter icon.
-
In the Filters dialog, do one of the following:
- Click the Processed AI models drop-down list to select an AI model that has been previously used.
- Click the Eligible AI models drop-down list to select an AI model that eligible to be used.
The Explore module dynamically displays all the related layers.
- Select any layer and feel free to explore it further.
Spatial Resolution
Spatial resolution refers to the level of detail in an image or a dataset thereby representing precision and accuracy. It measures the smallest object or feature that can be captured or represented in the data. Higher spatial resolution means smaller pixel size and greater detail.
To filter layers by spatial resolution, do the following:
-
Log in to platform.
-
Click the Globes module, click the Explore module, click the Filter icon.
-
In the Filters dialog, move the Resolution slider to increase or decrease the spatial resolution.
The Explore module dynamically displays all the related layers.
- Select any layer and feel free to explore it further.
AOI Types
Think of Area of Interest (AOI) as the specific geographic extent used to define an area on a map.
In the platform, you can filter layers by:
• Drawing AOIs (point, rectangle, polygon) • AOI Library • WKT
Draw
Simply draw an AOI on any area on the map and filter related layers.
To filter layers by drawing an AOI, do the following:
-
Log in to platform.
-
Click the Globes module, click the Explore module, click the Filter icon.
-
In the Filters dialog, click the Draw button, and then proceed to select one of the following options:
- Select the Point Tool option and then select a point on the map.
- Select the Rectangle Tool option and then draw a rectangle on the map.
- Select the Polygon tool and then draw a polygon on the map.
The Explore module dynamically displays all the related layers.
- Select any layer and feel free to explore it further.
Library
Select AOI from the AOI Library – a folder consisting of all the previously created AOIs.
To filter layers by selecting an AOI from the AOI library, do the following:
-
Log in to platform.
-
Click the Globes module, click the Explore module, click the Filter icon.
-
In the Filters dialog, click the AOI Library button.
-
In the AOI Library area, turn on the Filter viewport intersecting AOIs toggle to dynamically filter layers that are available in the area.
-
In the AOI Library area, use one filter or combine the following filters for more precise results:
-
Click the Select Tags dop-down list and then select an appropriate option.
-
Click the Select AOI drop-down list and then select an appropriate option.
(If you have previously created an AOI from the AOI Manager sub-module, then all your AOIs will be displayed here. See the chapter on AOI Manager for more information.)
All the layers within the Gulf of Mexico – having specific tags if selected - AOI will be displayed.
- Select any layer and feel free to explore it further.
WKT
Well-known text (WKT) is a human-readable text markup language for representing vector geometry objects. WKT can represent the following distinct geometric objects:
- Point, MultiPoint
- LineString, MultiLineString
- Polygon, MultiPolygon, Triangle
- PolyhedralSurface
- TIN (Triangulated irregular network)
- GeometryCollection
To filter layers by using WKT, do the following:
-
Log in to platform.
-
Click the Globes module, click the Explore module, click the Filter icon.
-
In the Filters dialog, click the WKT button.
Type or copy-paste the WKT coordinates in the WKT field and then click the Apply icon.
All the layers within the WKT coordinates will be displayed.
- Click the Save as New AOI button to save the WKT coordinates as AOI. This is an optional step.
The Save AOI dialog is displayed.
-
In the Save AOI dialog, type the name of the AOI in the AOI Name field, and then do one of the following: a. Select an existing tag from the Tags drop-down list. b. Type a new tag in the Tags field and then click the + Add New button.
-
Click Save. The WKT AOI along with the tag is saved in the AOI Manager sub-module. See the chapter on AOI Manager for more information.
Properties
When you select a layer, the Contextual Details section displays the metadata, detections, and properties of the layer.
You can filter layers by specific property. For example, you can type vendorId as the property and Sentinel-2 as the property name to filter layers with this specific property.
To filter layers by property, do the following:
-
Log in to platform.
-
Click the Globes module, click the Explore module, click the Filter icon.
-
In the Filters dialog, click the Properties Filter drop-down menu.
-
In the Properties Filter field, type or copy-paste a property id in the Has Properties field and press Enter. For example, type vendorId in the Has Properties field.
A new area called Match Values with the property id name field is created.
- In the Match Values area, select the vendorId checkbox and then type or copy-paste a vendor name in the associated field. For example, select the vendorId checkbox and type or copy-paste Sentinel-2 in field.
All the layers from the vendor Sentinel-2 will be displayed.
- Select any layer and feel free to explore it further.
Sorting Layers
This section presents information on how to sort layers according to your viewing preferences.
You can sort layers in the following ways:
- Ingestion Date
- Acquisition Date
- Layer Name
Ingestion Date
Sort and view layers by ingestion date or the date when the layers were collected and imported data from various sources into the platform – a place where layers are stored, processed, and analyzed.
To sort layers by ingestion date, do the following:
-
Login to platform.
-
Click the Globes module, click the Explore module, click the Sort icon.
The Sort drop-down list is displayed.
-
In the Sort drop-down list, select the Ingestion Date option.
-
Optionally, click the Arrow icon to sort layers in ascending or descending order.
Acquisition Date
Sort and view layers by acquisition date or the date when the layers captured by your organization or a vendor.
To sort layers by acquisition date, do the following:
-
Login to platform
-
Click the Globes module, click the Explore module, click the Sort icon.
The Sort drop-down list is displayed.
-
In the Sort drop-down list, select the Acquisition Date option.
-
Optionally, click the Arrow icon to sort layers in ascending or descending order.
Name of the Layer
Sort and view layers by name of the layer.
To sort layers by name of the layer, do the following:
-
Login to platform.
-
Click the Globes module, click the Explore module, click the Sort icon.
The Sort drop-down list is displayed.
-
In the Sort drop-down list, select the Name option.
-
Optionally, click the Arrow icon to sort layers in ascending or descending order.
Searching Layers
Search for layers seamless with name and extension of the layers.
To search layers, do the following:
-
Log in to platform.
-
In the Explore module, do one of the following:
-
Type the full or partial name of the layer in the Search field. For example, Sir Bani (partial name) or Sir Bani Yas (full name)
-
Type the extension of the layer in the Search field. For example, .tiff or .pdf
As soon as you start typing, the platform dynamically displays all the related layers.
- Select any layer and feel free to explore it further.
Toggling Footprint Visibility
The footprint visibility toggle turns on the footprint visibility of all the layers on the map.
When you turn on the footprint visibility, you can see polygons, images, and documents on the map denoting the footprints of the individual layers.
To turn on footprint visibility, do the following:
-
Login to platform.
-
Click the Globes module, click the Explore module, turn on the Footprint Visibility toggle to view footprints of all the layers on the map.
-
Click on any one of the footprints on the map and explore the layer.
Exporting Layers
Quickly export a layer for data analysis, reporting, or archiving. Use XLSX option for rich spreadsheets and CSV option for lightweight, system-to-system workflows.
XLSX
When you export a layer as XLSX, you get an Excel workbook with the layer’s attributes as a table; data types (number, text, date) are preserved where possible.
XLSX option can be used to sort, filter, or chart in Excel/Sheets as it supports large field counts and wide Unicode.
To export layer as XLSX, do the following:
-
Login to platform.
-
Click the Globes module, click the Explore module.
-
Click the Export icon and then click the Export XLSX option.
The layer is successfully downloaded to your local computer.
CSV
When you export a layer as CSV, you get a comma-delimited text file of the layer’s attributes; one row per record/feature.
CSV option can be used for for ETL, scripting, and ingestion into databases or business intelligence tools.
To export layer as CSV, do the following:
-
Login to platform.
-
Click the Globes module, click the Explore module.
-
Click the Export icon and then click the Export CSV option.
The layer is successfully downloaded to your local computer.